Project 1: Static Website on AWS S3
Introduction
In this project, we'll walk through hosting a static website on Amazon S3. Hosting on S3 offers a scalable, cost-effective, and highly available solution without the need to manage traditional web servers. Before we dive into the steps, I want to briefly discuss alternatives for hosting and why S3 might be a preferred choice.
Alternatives and Considerations
There are various ways to host web servers. Each method has its own pros and cons:
NGINX/Apache on VPS/Dedicated Server:
NGINX and Apache are widely-used web servers that provide complete control over hosting environments, making them ideal for dynamic and custom applications. These servers are typically deployed on a VPS or dedicated server, offering flexibility for advanced configurations. However, they require ongoing maintenance and expertise to manage infrastructure effectively, making them better suited for organizations with experienced DevOps teams.Windows Server with IIS:
Microsoft's IIS (Internet Information Services) is a web server tightly integrated into the Windows ecosystem, making it ideal for hosting ASP.NET-based applications. It offers enterprise-grade features like Windows Authentication and seamless compatibility with other Microsoft services. While IIS delivers excellent performance for enterprises already using the Microsoft stack, it can be resource-intensive and incurs additional licensing costs..Cloud-based Solutions (e.g., AWS S3, CloudFront):
Cloud-based hosting services like AWS S3 and CloudFront excel at serving static websites with global scalability and high availability. They eliminate the need for server management and ensure low latency by leveraging content delivery networks (CDNs). These solutions are cost-effective but are typically limited to static content unless paired with serverless technologies or backend services.Kubernetes:
Kubernetes is an orchestration tool designed for managing containerized applications, providing scalability, fault tolerance, and portability across environments. It is ideal for enterprises adopting microservices architectures or requiring robust DevOps pipelines. However, Kubernetes introduces operational complexity and is best suited for organizations with experienced teams and a need for managing distributed workloads.There are several other ways to host web servers that you will see in enterprise environments. I just wanted to list a few to give you an idea of where similar technologies to the ones used in this project would apply in real-world scenarios. Here's a brief breakdown of the differences between each example I mentioned, and where you might see it in an enterprise environment.
| Category | NGINX/Apache | Cloud-Based | Windows Server IIS | Kubernetes |
|---|---|---|---|---|
| Pros |
• Complete control over environment • Flexibility for custom/dynamic applications • Advanced configuration options |
• Global scalability & high availability • No server management • Cost-effective for static content |
• Seamless integration with Windows ecosystem • Enterprise-grade features • Strong support for ASP.NET applications |
• Scalability & fault tolerance • Portability across environments • Ideal for microservices architectures |
| Cons |
• Requires ongoing maintenance • Steep learning curve for advanced configurations • Infrastructure management overhead |
• Limited to static content without additional services • Less control over server environment • Potential vendor lock-in |
• Resource-intensive • Higher licensing costs • Windows dependency |
• Operational complexity • Steep learning curve • Requires experienced DevOps teams |
| Good For |
• Organizations with experienced DevOps • Custom and dynamic web applications • Advanced server configurations |
• Static websites • Global content delivery • Companies seeking low-maintenance solutions |
• Enterprises using Microsoft stack • ASP.NET applications • Organizations needing tight Windows integration |
• Microservices architectures • Enterprises requiring robust orchestration • Distributed workload management |
Alright, that should give you a solid idea as to why S3 is a good choice for what we're doing. This S3 website could potentially serve as a
portfolio to showcase projects that you complete; you can then add it to your resume as hands-on experience, putting you a step ahead of the competition!
Now we can get started with the project. Good luck!
Prerequisites
- An AWS Account (There's a free tier version)
- Very basic knowledge of HTML/CSS
- (Optional) A custom domain if you want to use one for your site
- (Optional) SSL certificate if you want to secure your site with HTTPS
- Log in to the AWS Management Console and navigate to the S3 service.
- Click Create bucket.
- Bucket Name: Enter a unique name, ideally matching your domain (ie: www.yourname.com) if you plan to use a custom domain.
- Region: Choose the appropriate region. Don't stress this, the default is likely fine here.
- Adjust other settings as desired. (a suggestion I would make is, instead of enabling bucket versioning, integrate github with your IDE)
- After the bucket is created, go to the Properties tab.
- Scroll to the Static website hosting section (should be at the very bottom
- Select Use this bucket to host a website.
- Enter the index document name (should be index.html)
- Go to the Objects tab of your S3 bucket.
- Click Upload and select your website files (HTML, CSS, JS, images, etc).
- Ensure that the files you want to be publicly accessible are uploaded.
- From the root directory of your bucket, go to the Permissions tab.
- Set the files to be publicly accessible.
You can do this by adding a Bucket Policy (simplest) or setting Object ACL to public-read for each file.
Here's an example of a bucket policy allowing public access:
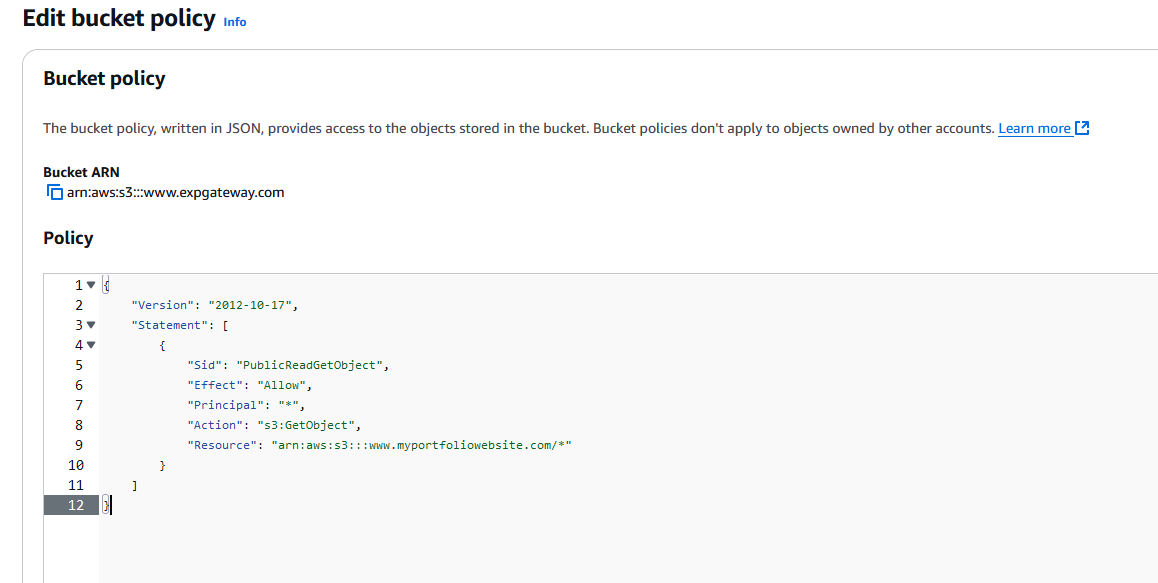 and just replace the ARN with the one for your bucket. You should be able to find and copy this at the top of your Properties tab.
 -
Create a Hosted Zone
- Log in to your AWS Management Console and go to Route 53.
- In the left-hand menu, click on Hosted zones.
-
Click Create hosted zone.
- Domain Name: Enter your domain name (yourname.com).
- Type: Choose Public Hosted Zone.
- Click Create.
- Create an Alias Record to Point to Your S3 Bucket
- Inside the Hosted Zone you just created, click Create record.
- Select Record type as A – IPv4 address
- Select "Yes" for Alias
- Under Alias Target, select the S3 endpoint that corresponds to your bucket.
- Click Create to save the record.
-
Log in to Your DNS Provider's Dashboard:
- Go to the website of your DNS provider (whoever you bought your domain through) and log in to your account.
- Find the DNS Management or Domain Management section, where you can manage your domain's DNS settings.
-
Create a CNAME Record to Point to Your S3 Bucket:
- In your DNS management panel, look for an option to add a record.
- Select CNAME as the record type.
- Host: Enter the subdomain you want to point (e.g., www if you're using www.yourname.com).
- Points to: Enter your S3 website endpoint. Again, this will look like your-bucket-name.s3-website-<region>.amazonaws.com.
- Click Save or Add Record.
- Once DNS propogates (shouldn't be more than a few minutes), try to navigate to your website using the domain you used. If you did not use a custom domain, you should be able to navigate there via the s3 bucket url.
- Make sure that everything loads correctly, and you can see your website's content.
-
Set up a CloudFront Distribution:
- Log in to the AWS Management Console.
- Navigate to the CloudFront service.
- Click "Create Distribution" and select Web delivery.
-
Configure the distribution to point to your S3 bucket as the origin:
- Select your S3 bucket as the origin domain.
- Adjust cache behaviors and settings as needed.
-
Update your DNS settings:
- Access your DNS provider's dashboard or AWS Route53.
- Change the relevant DNS record to point to the CloudFront distribution's domain name instead of the S3 bucket.
Step 1: Create an S3 Bucket
Step 2: Enable Static Web Hosting
Step 3: Upload Your Website Files
Step 4: Set Permissions for the Website Files
Step 5: Configure DNS (Optional)
If you choose to use a custom domain like www.yourname.com, you'll need to configure DNS to point to your S3 bucket. Otherwise, it will look something like this: your-bucket-name.s3-website-If You're Using AWS' Route53:
If You're Using a Third-Party DNS Provider (GoDaddy, Namecheap, etc.)
Step 6: Test Your Website
Step 7: Configure CloudFront for Better Performance (Optional)
If you'd like to use CloudFront for faster global delivery:Finished!
Awesome job! You’ve made it to the end of the AWS static hosting project and should now have a solid grasp on hosting a website in S3, linking up DNS through Route 53 (or a different provider), and possibly even accelerating content delivery with CloudFront.
If anything felt overwhelming, it's no big deal, learning new cloud services can be a rollercoaster. The important thing is you increased your familiarity with the cloud and got hands on experience with real-world tasks like setting up buckets, configuring domain records, and optimizing distribution for speed and scalability. That hands-on approach is what really cements your understanding for even bigger cloud projects down the road.
Practice, practice, practice!! If you think of any projects that you can do to further develop these skills, do it! Continue to sharpen these skills, and maybe try to find some family or friends that have said they'd like to have their own website, and use that as an opportunity to add to your portfolio!
Congrats on seeing this project through! You’re walking away with valuable cloud skills and a fully functional static site that you can keep refining. Stay curious, keep building, and celebrate how far you’ve come, you earned it!